Using Laravel 4.2+ with hybridauth package.

Follow the steps:

1) Start by editing composer.json and specifying that you need the latest version (denoted by *) of the HybridAuth package (hybridauth/hybridauth). By default Composer will search for the package in the Packagist repository:

{
	...
	"require": {
		...
		"hybridauth/hybridauth": "*"
	},
	...
}

2) Now run php composer.phar update (or composer update, depending on how your system is configured) to fetch and install the package.

3) Create a HybridAuth configuration file (app/config/hybridauth.php) and specify your social networks’ credentials:

you can get these ID and secret from app console of respective services.

<?php
return array(	
	"base_url"   => "http://URL/social/auth",
	"providers"  => array (
		"Google"     => array (
			"enabled"    => true,
			"keys"       => array ( "id" => "ID", "secret" => "SECRET" ),
			),
		"Facebook"   => array (
			"enabled"    => true,
			"keys"       => array ( "id" => "ID", "secret" => "SECRET" ),
			),
		"Twitter"    => array (
			"enabled"    => true,
			"keys"       => array ( "key" => "ID", "secret" => "SECRET" )
			)
	),
);

4) Edit your application’s Routes file (app/routes.php) with the following code:

This code can be easily ported to controller for keeping the route file clean.

Route::get('social/{action?}', array("as" => "hybridauth", function($action = "")
{
	// check URL segment
	if ($action == "auth") {
		// process authentication
		try {
			Hybrid_Endpoint::process();
		}
		catch (Exception $e) {
			// redirect back to http://URL/social/
			return Redirect::route('hybridauth');
		}
		return;
	}
	try {
		// create a HybridAuth object
		$socialAuth = new Hybrid_Auth(app_path() . '/config/hybridauth.php');
		// authenticate with Google
		$provider = $socialAuth->authenticate("google");
		// fetch user profile
		$userProfile = $provider->getUserProfile();
	}
	catch(Exception $e) {
		// exception codes can be found on HybBridAuth's web site
		return $e->getMessage();
	}
	// access user profile data or do database stuff 
	echo "Connected with: <b>{$provider->id}</b><br />";
	echo "As: <b>{$userProfile->displayName}</b><br />";
	echo "<pre>" . print_r( $userProfile, true ) . "</pre><br />";

	// logout
	$provider->logout();
}));

That’s  it. Just a few lines of code get you a social network authentication module up and running at http://URL/social/.

I do suggest that you move all logic to Controller/Model and keep your Routes clean.


ref.: laravel4-package-management-with-composer


Creating Printable PDF Academic Calendar

Follow this link to create Academic Calendars: http://www.timeanddate.com/calendar/create.html?year=2014&country=35

Printable PDF Calendars make customizing and printing calendars easy and convenient. It is now also possible to add your own events to the calendars.


Adding personal events

If you wish to add your own events to your PDF calendar, please start by setting up an event list before moving on to generating the calendar itself. Once the event list is created, you can add it to the calendar by checking a box in the PDF Calendar set-up menu (see instructions below).

How to set up an event list

Creating a PDF calendar

  • Start with choosing your Calendar Type.
    • Monthly will create separate calendars for each month. You will have 12 pages for 1 year.
    • Yearly will generate a single page calendar with all the months in the year on 1 page.
  • To choose a design for your calendar, click on any of the 3 calendars in the black box on the right hand side.
  • Select the year for your calendar using the Year drop down.
  • Choose a starting month for your calendar from the First Month drop down.
  • Then add the number of months or years to be displayed in your calendar. You can add up to 36 months.
  • If you choose the yearly calendar type, you have the option of generating and printing calendars for up to 3 years at a time. Please note that all 3 calendars will have the same starting month.
  • Next select the country of your choice. This allows for country specific holidays to be included in the calendar.
  • Select the state/region of your choice to include state specific holidays. Note that not all countries have this option available.
  • You can choose the kinds of holidays and other relevant information to be included in the calendar by clicking on the Holiday Options drop down menu and then checking relevant options.
  • If you do not want any holidays to be displayed, uncheck all the options under the Holiday Options drop down.
  • Choose religious holidays to be displayed on your calendar by clicking on the Religious Days drop down option under Holiday Options.
  • Give your calendar a heading or title.
  • Next choose colors to highlight holidays and observances in your calendar using the Calendar Colors drop down.
  • Select the paper format for your printed calendars. You can choose between A4, Letter and Legal.
  • If you wish to add your own events to the calendar and you have set up an evet list (see above), you can add one or more event lists to your calendar by checking the box(es) next to Add events.
  • Click on Create PDF and your calendar will be automatically downloaded to your computer. Save it on your computer to print later or print it right then and there.


Adding personal events to the Printable PDF Academic Calendar


To add personal events to our 

Finding out which process is locking a file or folder in Windows? Or Deleting a locked file in windows!


This is really an annoying condition. It happens many time, while in MS word, or if you open a file from your personal web server, a folder you are working on or file you just closed. It could be any of these or due to some unknown reason, the folder/file get locked and it gets difficult to delete or rename the folder or file.

image

This happens due to a simple reason – some of your software, process, thread is using it and yet not finished closing it. Every open file is being assigned with a numeric file handle by OS, so that a process or software can identify it. What we need simply is to find out which software or process “File Handle” is using our file or folder.

Normally this is not easy, but Microsoft had made this really easy for us. Microsoft has created a software suit called “Windows Sysinternals” for IT pro and System administrators. This suit consists of various tiny but powerful software tools to manage, troubleshoot and diagnose your Windows systems and applications.

You can download the entire Suit at:

http://technet.microsoft.com/en-us/sysinternals/bb842062

or any single utility at:

http://technet.microsoft.com/en-us/sysinternals/bb545027

What we need today for our problem is “Process Explorer”, which can be downloaded from:

http://technet.microsoft.com/en-us/sysinternals/bb896653

Download and Run “procexp.exe” tool from there.

image

It will take some time to populate all running process.

Look for the find tool in toolbar or menu bar.

image

Open this find handle or DLL box to search for the blocking handle.

image

In this find box just type the exact name of file or folder is being locked.

The search utility will find the handle for process or software that were using or opened your file. Click on the search result to see detail in lower pan of main window.

image

In this case it was notepad opened a handle to my file preventing me from deleting the file/folder.

image

Right click on the file handle entry and just select Close Handle.

image

And yes this is really important! You must be aware of what you are closing.!

Click yes to go ahead!

Now you are free to rename/delete/move or edit your file/folder.

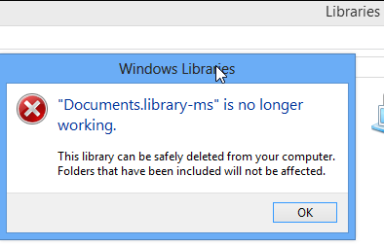
How to resolve error – “Documents.library-ms is no longer working”

“Documents.library-ms is no longer working”

Image

Recently I got this  error while saving data in my “My Document” folder in windows 8.

I really got shocked to see the error as I was having many of my important document in Document folder. Then I checked other libraries, and to my surprise same error. I really got worried now. But apparently I found an easy solution immediately.

Please follow these steps to resolve the error.

1) Go to Libraries in Windows Explorer

2) Right-click whichever library folder gives you an error.
3) Delete the folder.

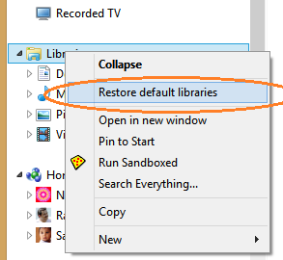
4) Right-click on the Libraries folder.

5) Select “Restore Default Libraries.”

Image


You’ll get your library back with all content intact.!!!!!!